Hi All..!! I
just cannot express how happy I am to see all of us alive at the doomsday.
News these days are quite funny huh. Funny to an extent that even NASA has to give explanations that earth would survive for a lot more billion years.
Coming out
from the doom’s day story, I would like to thank you all for your appreciation
for my last article on EPF Challans. A lot of you asked if employees could also
check their PF Status through the portal and here’s the answer. Yes, if you’re
an employee in any organization where your provident fund is being deducted,
you’d be able to check the status of the same. A couple of days before, I read
an article about the same which I’m very pleased to share with you. Please go
through it and share your views with us.
As we were discussing
about the revolutionary activities in HR this year, today I’m, going to
enlighten you about the online filing of ESI Monthly Contributions. Many of you
may already be aware of this concept but there are still a lot of employers/organizations
who are not friendly of this brilliant system upgrading by the Government. From
this year itself, employers have been provided with the facility of filing
monthly ESI Challans via ESI Portal.
So, how do we utilize this benefit of filling the Monthly Contributions (MC) online? Let's move ahead one by one.
Understanding the User Panel
1. Collect the
User-Id and Password from ESIC Officials. After receiving the User-Id and
Password, please open ESIC portal www.esic.in.
2. Hit the “Click
here to Login” button and enter your username and password.
3. On
successful login, the application displays hyperlinks under each of the modules
as shown in following figure.
4. Monthly
contribution and Challan Generation is a two step process –
a. Purify/Update
Data – Make sure the employee/IP details are correct in the computer system. For
this you need to add new employees and/or add existing IPs if anyone is missing
as well as remove any incorrect IPs.
b. File Monthly
Contribution and Generate Challans.
5. Before
registering new IP (Insured Person) of Filling Challans, make sure employer
details are filled correctly. Click on “Update Employer Details” for this purpose
and submit your details as per the system requirements.
Steps to do before filing MC –Data Purification
1. Main unit
–Main Unit can file contribution for Employees who are with the main-unit only.
2. Sub-unit
–Sub-unit can file contribution for Employees who are assigned with sub-unit.
3. Main-unit if
desires to file contribution for sub-unit then main-unit should login with
sub-unit user-id and password.
4. Ensure the
current IPs available with Employer are mapped in the System. To check this, do
the following.
a. Data
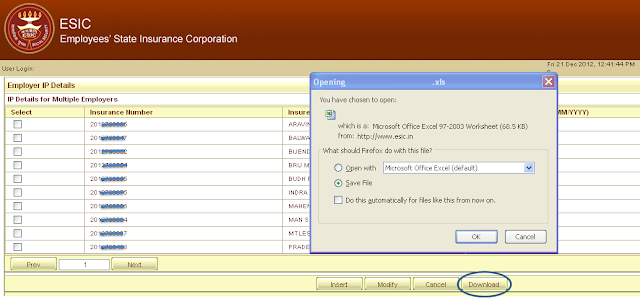
Migration/Insert IP Details Download
Existing IPs & Find out Missing IPs. Explained in subsequent pages.
b. Data
Migration/Insert IP Details Insert
missing IPs (This is valid for only those IPs who already have „Insurance
Number‟
but the data is missing against the employer)
i. Use online screen to insert (if only
very few IPs are missing).
ii. Use excel upload to upload missing
IPs in bulk
c. Make
sure all the new Employees (Those who doesn’t have Insurance Number) are registered for the
Employer -Register
New IP .
Note: The 10
digit IP number given to an IP is valid for life time and same number can be
used anywhere in India. i,e., if a person changes job from one state to another
or one region to another the IP number does not change.
Checking IPs associated with the Employer in the system
1. Click on
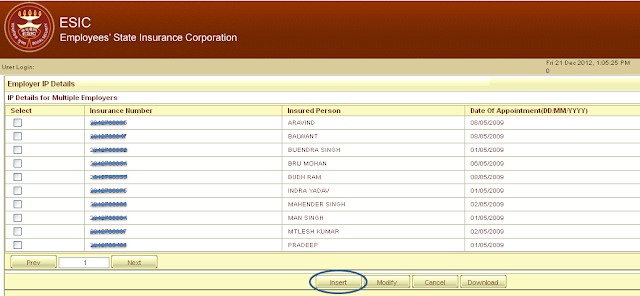
Insert IP Details Link.
2. You will get
another window with list of IPs from where you can download details of Insured Persons
(IPs).
3. Employer may
find everything correct or some IP missing or some incorrect IPs present in the
list.
4. In case IP
is missing, employer can Insert the IPs which is explained later.
5. Incorrect
IPs can be removed from the list while filing contribution.
Insert IP into the Employer list (IPs already have IP number)
1. Employers
can Insert IP using “Insert IP” link if the IP is not in the computer system or
the IP is/was working with another Employer. IP can be inserted in two ways .
a. Employer can insert IPs one by one
using the screen.
b. Excel / bulk upload (to add many IPs
together) -Download the template. Provide the details and upload up to 500
Employees at a time.
Registering New Employee into ESIC –Generate Insurance Number Figure
1. Click on
Register New IP link.
2. You will get
another window to register new Employees.
3. Employer
Code will populate by default. Employers should select continue to load “IP
Registration Page‟.
Filing Monthly Contribution
1. Once Data
Purification is complete / Employee records are cleaned up, MC can be filed.
2. Click File
Monthly Contributions link to file the contribution of the employer for a
particular month.
3. You’ll be
redirected to “Monthly Contribution Page” where you’d be asked to fill in
contribution month and year and details.
4. There are
two ways to file contribution: Excel Upload (see following image) and Online Entry of Contribution.
Note: Kindly turn
OFF ‘POP UP BLOCKER’ if it is ON in your browser. Follow the steps given to
turn off pop up blocker. This is required to upload MC excel, modify or print
Challan/ TIC.
After Submitting the Monthly Contribution
Generate and Print Challans
Modify Challans
View Contribution History
I assume this information would be beneficial to you and help you manage your payroll in a more organized manner. Should you need any more information, I'm here to assist you on the same.
See you this Monday.. Till then, enjoy the doomsday. Happy Living..!!


Thank you soo much for this important and useful information,i actually forwarded to my HR Person. I hope it will help him alot, you do a very informative things in your every article :)
ReplyDelete